
Documentation Index

Fetch the complete documentation index at: https://docs.flagmint.com/llms.txt

Use this file to discover all available pages before exploring further.

Get started in five steps

Go from zero to evaluating feature flags in your application.
1

Create an account and project

Sign up at app.flagmint.com and create your first project. Every project comes with Live and Staging environments out of the box.
2

Generate an API key

Each API key is scoped to a specific environment within your project. This means you’ll typically have separate keys for staging and production.From the dashboard, navigate to Settings and click Api keys.Fill in the details:
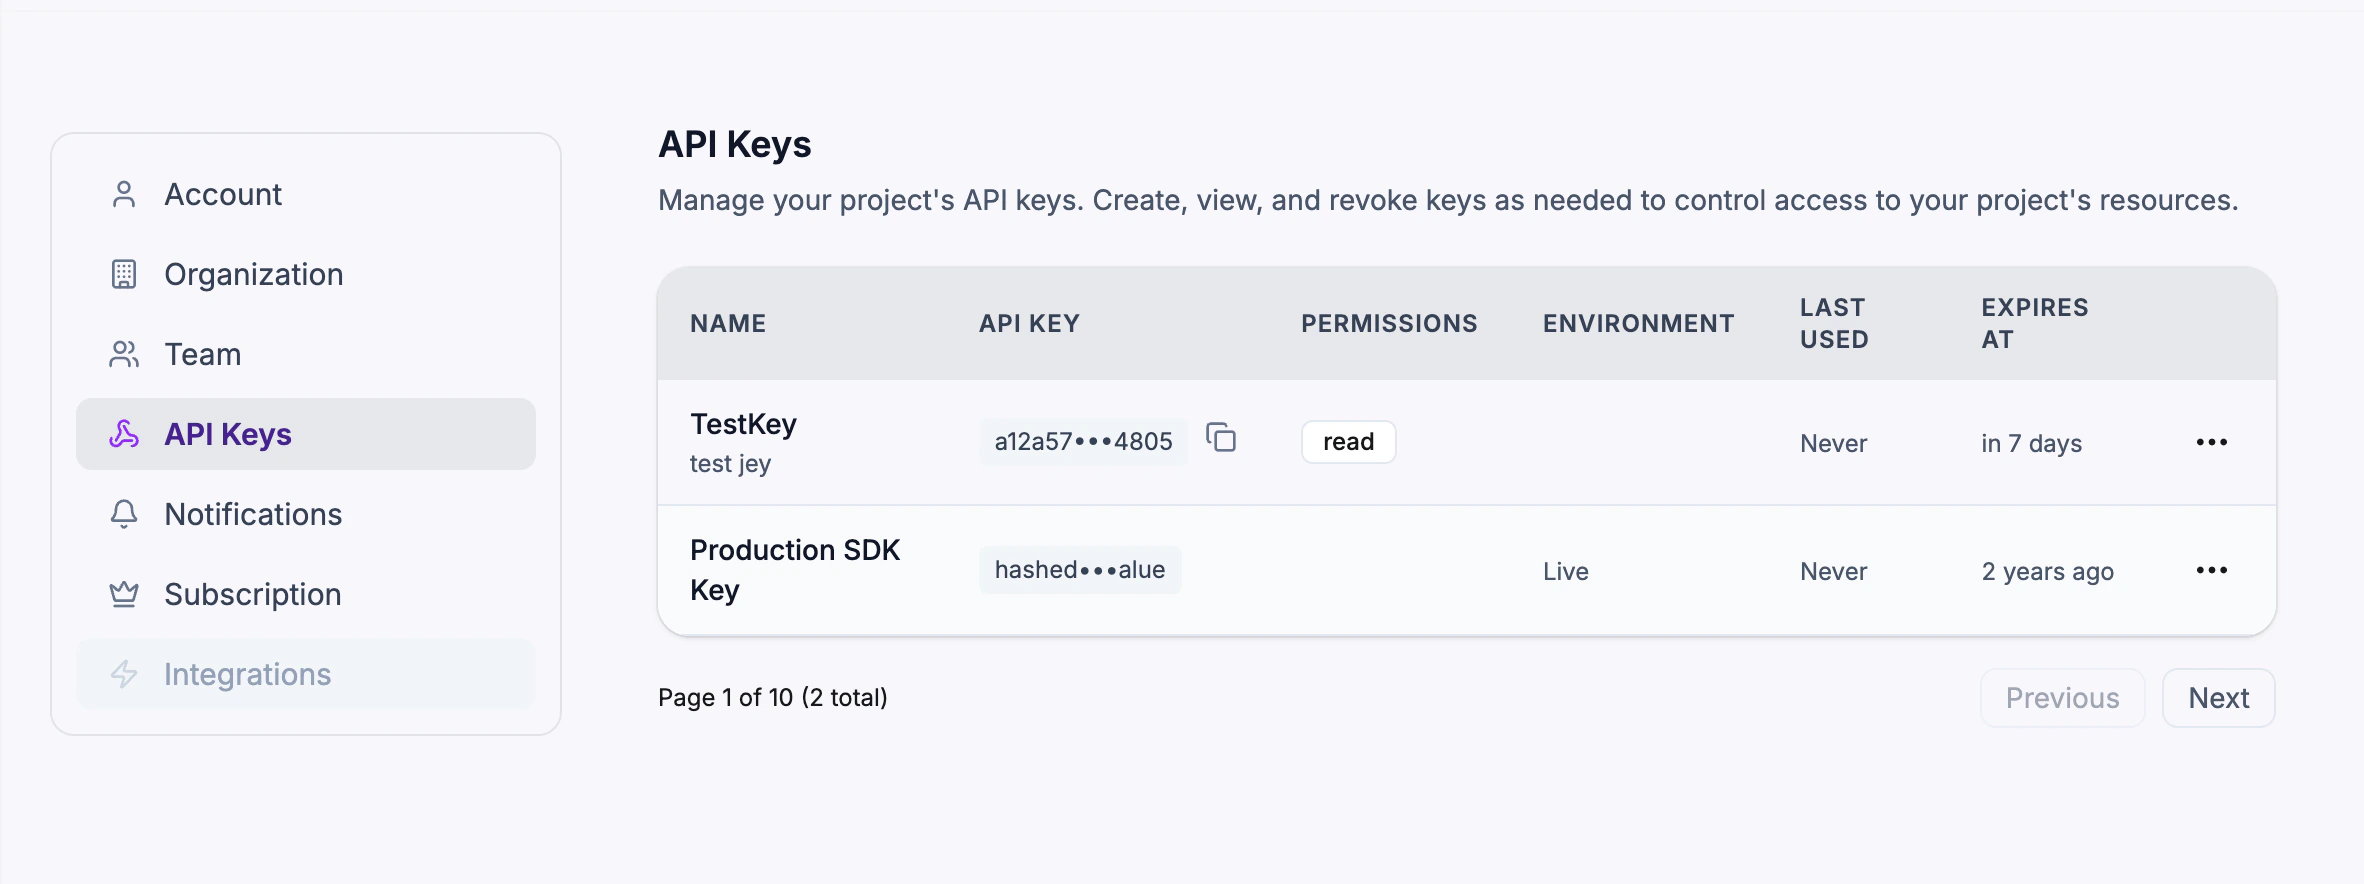
  • Name — A memorable label (e.g. “Production Server”, “CI/CD Pipeline”)
  • Environment — Select which environment this key authenticates against (e.g. Live or Staging)
  • Permissions — Choose read, write, or admin depending on the use case
  • Expires At — Optionally set an expiration date. Leave empty for keys that never expire.
Click Generate Key. The full API key is shown once and copied to your clipboard automatically.
Store your API key securely. The full key is only displayed once at creation time. After that, only a masked version is visible in the dashboard. If you lose it, revoke the key and create a new one.
Your API keys table shows all active keys with their name, masked key, permissions, environment, last used timestamp, and expiration:API keys table showing name, masked key, permissions, environment, last used, and expiration columnsYou can revoke any key at any time — applications using that key will lose access immediately.
3

Install the SDK

Install the Flagmint JavaScript SDK in your application:
npm install flagmint-js-sdk
4

Create your first flag

From the dashboard, click + New Flag and choose a template:
  • Kill Switch — Boolean flag that’s on by default. Flip it off in an emergency.
  • Gradual Rollout — Boolean flag that starts at 0% and increases over time.
  • A/B Test — Multivariate flag for experiments.
Or create a standard flag with full control over type, key, and configuration.For this quick start, create a Kill Switch called “New Dashboard”:
curl -X POST https://api.flagmint.com/projects/{projectId}/flags \
  -H "Authorization: Bearer YOUR_API_KEY" \
  -H "Content-Type: application/json" \
  -d '{
    "name": "New Dashboard",
    "template": "kill_switch"
  }'
5

Evaluate flags in your app

Initialize the SDK with the API key you generated in Step 2. The key determines which environment’s flags are returned:
import { FlagClient } from 'flagmint-js-sdk';

const client = new FlagClient({
  apiKey: 'ff_your_api_key_here', // Your environment-scoped API key
  context: {
    kind: "multi",
    user: {
      kind: "user",
      key: "user123",
      email: "alice@example.com"
    },
    organization: {
      kind: "organization",
      key: "org456",
      plan: "premium"
    }
  }
});

// Wait for connection — wrap in try/catch for resilience
try {
  await client.ready();
} catch (err) {
  console.warn('Using cached flags:', err.message);
}

// Use your flag
const showNewDashboard = client.getFlag('new_dashboard', false);

if (showNewDashboard) {
  renderNewDashboard();
} else {
  renderLegacyDashboard();
}
The SDK connects via WebSocket for real-time updates (with automatic long-polling fallback) and caches flags locally by default for offline resilience.
One API key per environment. Use your Staging key during development and your Live key in production. The SDK automatically receives the correct flag values for the environment the key is bound to.
Always wrap ready() in a try/catch. If the Flagmint API is unreachable, ready() will reject. Cached flags may still be available via getFlags() — see the Error Handling section for details.

React integration

For React apps, use the subscribe() method to keep your UI in sync with flag changes:
import { useEffect, useState } from 'react';
import { FlagClient } from 'flagmint-js-sdk';

const client = new FlagClient({
  apiKey: 'ff_your_api_key_here',
  context: {
    kind: "user",
    user: { kind: "user", key: "user123" }
  }
});

export function App() {
  const [showDashboard, setShowDashboard] = useState(false);
  const [ready, setReady] = useState(false);

  useEffect(() => {
    const unsubscribe = client.subscribe((flags) => {
      setShowDashboard(flags['new_dashboard'] ?? false);
    });

    client.ready()
      .then(() => setReady(true))
      .catch(() => setReady(true)); // flags may be set from cache

    return () => unsubscribe();
  }, []);

  if (!ready) return <div>Loading...</div>;

  return showDashboard ? <NewDashboard /> : <LegacyDashboard />;
}

Invite your team

Invite team members to collaborate on your feature flags. From the dashboard, navigate to Settings and add users by email. Team members can be assigned Editor or Viewer roles. Editors can create and modify flags, segments, and targeting rules. Viewers have read-only access to all project data.

Managing API keys

API keys are managed from the Settings page. You can:
  • Generate new keys scoped to any environment with specific permissions
  • View all active keys with masked values, permissions, environment, and last-used timestamps
  • Revoke keys instantly — any application using the revoked key loses access immediately
Revoke API key confirmation dialog showing key details and warning
Best practice: Create separate API keys for each deployment (e.g. one for your production server, one for CI/CD, one for local development). This way you can revoke a compromised key without affecting other deployments.

Updating context after login

When your user logs in or their attributes change, update the evaluation context to get re-evaluated flags:
await client.updateContext({
  kind: "multi",
  user: {
    kind: "user",
    key: "user123",
    email: "alice@example.com",
    plan: "premium"
  },
  organization: {
    kind: "organization",
    key: "org456",
    country: "DE"
  }
});
This triggers a re-fetch of flags with the new context, so targeting rules and rollouts reflect the updated user attributes.

Kill the feature

When something goes wrong, disable the flag instantly — either from the dashboard toggle or via the API:
curl -X PUT https://api.flagmint.com/projects/{projectId}/flags/{flagId} \
  -H "Authorization: Bearer YOUR_API_KEY" \
  -H "Content-Type: application/json" \
  -d '{
    "is_active": false,
    "envId": "YOUR_ENVIRONMENT_ID"
  }'
The SDK receives the update in real time. All users immediately get the off variation (false).

What’s next

SDK Reference

Full SDK documentation — caching, transport modes, deferred initialization, and more.

Targeting Rules

Control who sees what with segments, custom rules, and rollouts.

Segments

Define reusable audiences for consistent targeting across flags.

Projects & Environments

Organize flags with per-environment configuration.